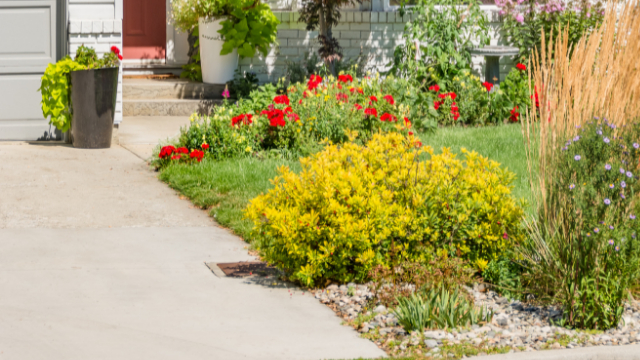
Ever dreamed of transforming your home into a charming oasis with curb appeal for days? Look no further than the humble rock border! Today, we’ll guide you through the exciting journey of creating a beautiful and functional rock border around your house.
Whether you’re a seasoned DIYer or simply seeking a low-maintenance landscaping solution, this article is your roadmap to success. We’ll break down the process into simple, achievable steps, offering inspiring design ideas and practical tips along the way. So, grab your gardening gloves and get ready to rock your yard!
This guide is tailored for homeowners who value both aesthetics and practicality. Whether you’re passionate about creating a picture-perfect landscape or simply seeking a manageable way to improve drainage and prevent erosion, rock borders offer the perfect blend of beauty and function.
Get ready to unlock the potential of your outdoor space and discover the many benefits of rock borders, including:
- Curb appeal that turns heads: Enhance your home’s visual impact with a touch of natural elegance.
- Effortless maintenance: Say goodbye to endless weeding and mowing – rock borders offer a low-maintenance solution.
- Durable and long-lasting: Enjoy a landscape that thrives year after year with minimal upkeep.
- Endless design possibilities: From sleek and modern to rustic and natural, create a border that reflects your unique style.
- Improved drainage and erosion control: Protect your foundation and keep your yard healthy with proper water management.
- Increased property value: Invest in your home’s value with a timeless landscaping upgrade.
Are you ready to transform your yard and unlock the beauty and practicality of a rock border? Buckle up, because the exciting journey begins now
Unlocking the Power of Rock Borders
Tired of battling relentless weeds and watching your soil erode around your home? Rock borders offer a stylish and practical solution, enhancing your home’s curb appeal while simplifying maintenance.
No matter your experience level in landscaping, creating a rock border is an achievable project with significant rewards. We’ll guide you through the process every step of the way, providing clear instructions and inspiring ideas to unlock your creative potential.
This guide is ideal for homeowners who desire both beauty and functionality. Whether you yearn for a stunning landscape or seek a simple method to improve drainage and prevent erosion, rock borders provide the perfect combination.
Here’s a glimpse into the benefits you can expect:
- Enhanced curb appeal: Elevate your home’s visual impact with the natural elegance of a rock border.
- Effortless upkeep: Say goodbye to endless weeding and mowing. Rock borders offer a low-maintenance approach to outdoor spaces.
- Unwavering durability: Enjoy a landscape that thrives for years to come with minimal upkeep. Rock borders are a reliable investment.
- Versatility in design: From sleek and modern to rustic and natural, create a border that reflects your unique style.
- Healthy yard, protected foundation: Improved drainage and erosion control safeguard your foundation and maintain your yard’s beauty.
- Increased property value: Invest in your home’s future by making it more attractive to potential buyers.
Planning Your Rock Border Masterpiece
Now that you’re fired up about the amazing possibilities of rock borders, let’s dive into the planning process! This is where your vision takes shape, so grab your pen and paper (or favorite digital planning tool) and get ready to unleash your creativity.
Step 1: Define Your Goals and Objectives
What do you hope to achieve with your rock border? Is it purely for aesthetics, or do you have functional needs like improved drainage or erosion control? Do you want a low-maintenance solution, or are you willing to invest more time and effort for a specific design? Defining your goals helps guide your decisions throughout the process.
Step 2: Choose the Perfect Location
Where will your rock border shine? Consider factors like:
- Sunlight and shade: Different plants thrive in various light conditions. Choose a location that suits your desired greenery.
- Traffic flow: Avoid high-traffic areas where the border might get damaged.
- Size and shape: Measure your chosen location to determine the necessary materials and plan your border’s shape.
- Existing features: Consider how the border will complement or integrate with existing landscaping elements.
Step 3: Explore the Rock Realm
The type of rock you choose makes a significant impact on your border’s aesthetics and functionality. From smooth river stones to rugged boulders, explore different options based on:
- Color and texture: Match the rock’s appearance to your desired style and surrounding elements.
- Size and weight: Consider the ease of handling and the scale of your border.
- Drainage properties: Certain types of rock offer better drainage than others.
Step 4: Calculate and Conquer (Materials & Budget)
Now comes the practical part. Measure your chosen location to determine the amount of rock, edging (if needed), and landscaping fabric (optional) you’ll need. Research local prices and set a realistic budget, factoring in tools and potential extras.
Step 5: Tools Up!
Gather the necessary tools before you begin construction. This might include shovels, a wheelbarrow, gloves, a tamper, edging supplies (if using), and a level. Planning ahead saves time and ensures a smooth construction process.
Part 4: Transforming Your Yard: Laying the Rock Border
- Soil Preparation:
- Clear the chosen area of any debris, vegetation, and sod.
- Define the border edge with string or spray paint.
- Consider using landscaping fabric for weed control (optional).
- Level the soil and create a trench for edging (if using).
- Compact the soil base for stability.
- Choosing a Laying Method:
- Dry-laid: Rocks placed directly on the soil (ideal for drainage).
- Mortared: Rocks secured with mortar for a permanent, sturdy border.
- Partially mortared: Combines the drainage benefits of dry-laid with the stability of mortared (suitable for curved borders).
- Laying the Stones:
- Start with the edging (if using) and follow your chosen design.
- For dry-laid borders, position larger rocks first, then fill with smaller stones and gravel.
- For mortared borders, mix mortar according to instructions and apply it sparingly between stones.
- Ensure proper drainage by creating slight slopes and avoiding gaps.
- Regularly check and adjust the level of the stones throughout the process.
- Finishing Touches:
- Fill any remaining gaps with smaller stones or gravel.
- Tamp down the entire border to ensure stability.
- Add plants, mulch, or decorative elements for a personalized touch.
- Maintenance Tips:
- Regularly remove weeds and debris.
- Replenish mulch as needed.
- Occasionally check the edging (if used) for any looseness.
- Enjoy your beautiful and functional rock border for years to come!
Remember:
- Include visuals like diagrams and pictures to illustrate the steps.
- Use clear and concise language with actionable instructions.
- Offer variations and modifications based on specific needs or preferences.
- Conclude with a sense of accomplishment and encouragement.
Source: How to Create a Beautiful Rock Border Around Your House


